

With saggy breasts becoming a common problem these days, most women desire to get fuller, firmer and lifted breasts. Although there are various factors that can cause breast sagging such as weight loss, smoking, pregnancy, age, etc, there are still some ways in which this sagging can be reversed. Gone are the days when getting under a surgical knife and wearing push up bras were the only ways to lift up your chest and get firm breasts. As breasts consist of fatty tissues which lie over the chest muscles, exercising and working them out can surely strengthen them and give you a firmer and lifted breasts. Without a further ado let's hop right in and learn about 7 exercises that will help you to lift up your breasts and make them firmer and rounder.
Table of Content:-
Exercises to lift up your breasts naturally.

Image Credits- Women Working
Also Read: Do These 5 Exercises Daily To Tighten The Loose Skin
Well it's true that working out would not change your cups from A’s to B’s but it can surely help to lift them up and give them a firm appearance. Here are 7 exercises that you can practice at the ease of your home without any equipment to lift those saggy breasts.
1. Wall push
A wall and a little will power is all you need to perform this exercise and get firm breasts. An exercise that can also be performed by beginners, wall push is a simple yet effective exercise that workout your chest, arms and shoulder muscles. This exercise helps to perform an isometric muscle contraction without moving your joints or bones.

Image Credits- BioFunctional Health Solution
Follow these steps to perform wall push in an effective manner-
- Face the wall and stand at a 2 feet distance from it.
- Open your hands and legs shoulder width apart and place your palms against the wall.
- Lean towards the wall while bending your elbows so that your chest touches the wall.
- Once reached the point, push yourself back to the stating position
- Do 8 reps of this for 3 sets.
2. Cobra Pose
Popularly known as bhujangasana, Cobra pose is a yoga posture that is performed in a cycle of asanas as a part of Surya Nmaskar. It is a great way to strengthen your chest muscles, stretch them and increase the blood flow in your upper body. Not just this but it also helps to stretch out abdomen, lungs, shoulders and tone your buttocks at the same time.

Image Credits- YouTube
An exercise that provides relief from stress and fatigue, cobra pose can be performed by following these simple steps-
- Lie down on your stomach with your face towards the ground.
- Make sure that your legs are hip width apart.
- Place your palms on ether side of your chest in a way that they are pressing the floor.
- Push the floor, lift your chest and extend your neck in order to look towards the ceiling.
- Make sure that your lower body is not moving and is still against the floor.
- Hold this pose for 30 seconds and come back to your starting position.
- Perform 5 reps of this exercise for 3 sets.
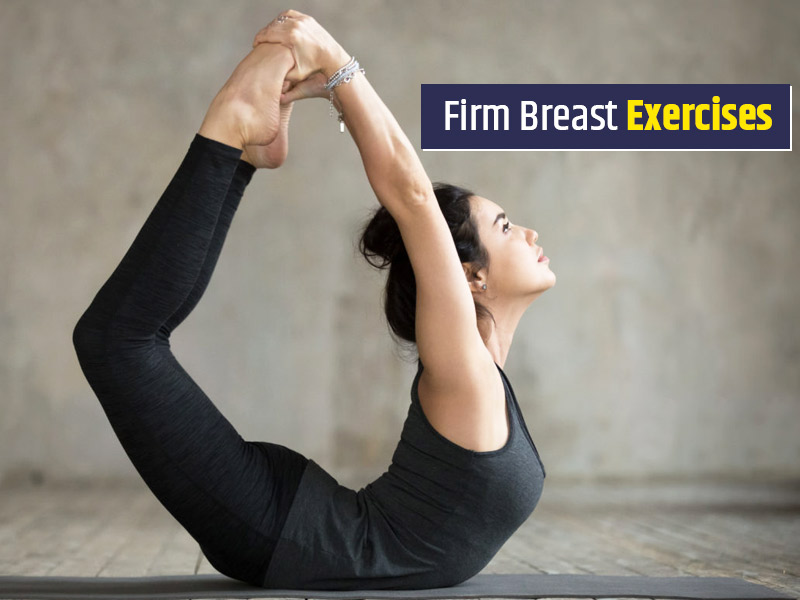
3. Bow Pose
A yoga pose known to scratch out the chest, groins, throat, abdomen, ankles, thighs, and the entire front of the body. This exercise not just stretches out your body but also helps to get a better posture, strengthen back muscles and stimulate the neck and abdomen organs.
Popularly known as dhanurasana, this yoga exercise will help you to lift up your saggy breasts and to get them back in shape.

Image Credits- Yoga Class Plans
Also Read: 4 Yoga Poses You Should Do Everyday
Here is how you can perform the bow pose of dhanurasana-
- Lie flat with your stomach on the floor and your face towards the ground with your knees hip width apart
- Keep your hands along the torso with palms facing upwards.
- Bend your knees and bring your feet close to your hips. (as close as possible)..
- Grab your ankles with your hands and hold firmly.
- Now slowly lift up your heels and thighs away from the floor and your hips.
- Lift up your chest and try to look up.
- Hold on this position for about 10 seconds and slowly come back to your starting position.
4. Push Ups
Known for building the upper body, this exercise helps to work your chest, abs, shoulders, triceps and pectoral muscles. A fast and effective exercise that engages the core and abdominal muscles, push ups help to build up strength. Also known to strengthen the lower back, this exercise can do wonders to your body if performed correctly.

Image Credits- Tony Gentilcore
Also Read: How To Do Push-Ups Correctly? Steps And Benefits
Follow these steps to know the right way of performing push ups-
- Get into a high plank position with your palms facing the ground and your body aligned.
- Bend your elbows and lower your body to an extent that your elbows make a 45 degree angle with the floor.
- Stay steady, push back and get into the starting position.
- Repeat this exercise for 3 sets of 8 reps each.
5. Inverted wall push up
A slightly difficult exercise that is an advanced version of wall push, inverted wall push ups or wall handstand push up can be a little tricky at the start but are very effective. This exercise helps to strengthen your lower back, abdominal and chest muscles along with working out your shoulders, abs, pectoral muscles and triceps. This exercise will help to strengthen your glutes, core, upper body and shoulders.

Image Credits- Oxygen Mag
Make sure that you perform this exercise with safety by following the instructions very carefully.
- Place your hands about 6-12 inches away from the wall with your plans facing down and a bit waide than the width of your shoulders.
- Kick up the wall with your heels to get into a headstand position.
- Once you get into the headstand position try to balance your body and establish a midline position.
- Maintain this position and slowly lower down your body till your head touches the floor.
- Maintain an angle of 45 degrees between your elbows and the ground as you go down.
- As your head touches the ground, press up your hands against the ground and push yourself back up.
6. Superman
Known as Viparita Shalabhasana, or superman pose, this exercise is pretty similar to the cobra pose and can be considered to be an advanced version of it.This yoga exercise helps to tone your abdomen, provide flexibility to your back, improve blood circulation, strengthens and stretches the chest, shoulder, legs, lower back and abdomen muscles along with providing a stretch to your body. Not just this but viparita shalabhasana also helps to improve concentration power.

Image Credits- Planet Fitness
Here is how you can perform this exercise-
- Lie flat on your stomach with your hands above your head and pals facing the ground.
- Keep your legs close with your feet touching each other.
- Stretch your arms as far as you can and lift up your arms, chest, legs and thighs away from the ground.
- Hold onto this position for 5 seconds and come back to rest while exhaling slowly.
7. Traveling Plank
Walking plank or traveling plank is an advanced version of your basic plank exercise that helps you to strengthen the upper body, core and a group of lower body muscles as well. An exercise known to improve your body posture, decreases the risk of back injuries, improves balance, makes your body flexible, elevates mood and is also good for your digestive health.
Follow these steps to perform traveling plank exercise in the correct manner-
- Get into a high plank position with your head, back and hips aligned.
- Make sure that your core is tight and strat by lifting up your left foot and left hand and moving it one step towards the lift.
- Do the same with your right hand and foot.
- Pause after every rep and switch sides after completing 10 steps.
Read more articles in Exercise and Fitness
Also watch this video
How we keep this article up to date:
We work with experts and keep a close eye on the latest in health and wellness. Whenever there is a new research or helpful information, we update our articles with accurate and useful advice.
Current Version